|
|
WinPilot 3D
WinPilot 3D is flight analysis and planning software, that
lets you zoom in from satellite altitude into any place on Earth,
leveraging Landsat satellite imagery and Shuttle Radar Topography
Mission elevation data. WinPilot 3D lets you experience Earth
terrain in visually rich 3D, just as if you were really there.
WinPilot 3D also shows airspace in 3D, and contains world-wide
database of airports and runways. It allows preparing a task,
transferring it to a Pocket PC, and then analyzing the resulting
flight log after the task in finished.
WinPilot 3D features:
- High Resolution 3D display terrain of any place on Earth
- World-Wide database of airports, runways, radio frequencies
- Airspace Database with OpenAir text output
- Database of all flights sorted by Date, Pilot's Name and
Soaring Site
- Comprehensive Flight Statistics
- Automated setup - aviation databases keep themselves up to
date
- Flight playback
- FAI area for creating FAI triangles
- Free 30 days trial
Statistics
Thermal Database
 Marking and Uploading Wave Spots. In addition to
database of thermals, WinPilot also contains an on-line
database of wave locations. All registered users can
upload their wave flights/locations to that database.
This data can then be transferred to WinPilot ADV/PRO on
a Pocket PC, and used during a blue wave day, or when a
blue segment of terrain needs to be crossed during a
cross-country wave flight. Here are the steps:
Marking and Uploading Wave Spots. In addition to
database of thermals, WinPilot also contains an on-line
database of wave locations. All registered users can
upload their wave flights/locations to that database.
This data can then be transferred to WinPilot ADV/PRO on
a Pocket PC, and used during a blue wave day, or when a
blue segment of terrain needs to be crossed during a
cross-country wave flight. Here are the steps:
1. Open a wave flight log using File.Open.
2. On the Toolbar, switch from 'Thermal Flights' to
'Wave Flights'. This enables wave segment selection
buttons (see left), and sets them into the 'Select Start
of Wave Segment' mode (see left).
3. Touch a portion of a flight log where you want a
given wave segment to begin. This will change the color
of that spot to blue, and change the default button to
'Select End of Wave Segment'.
4. Touch a portion of a flight log where you want a
given wave segment to end. This will change the color of
that spot to brown, and draw this wave segment on the
screen.
5. If the segment is located properly, click the
'Plus' wave button to add that segment to the local
database. If you want to change this segment, press the
'Delete' wave button (red square), and start over, or
press 'Start' or 'End' wave, and edit these locations.
6. After all wave segments for that flight log have
been added to your satisfaction, you can upload them to
our global database using Statistics.Thermals.Send To
Internet.
Note: If you are preparing for a wave flight, you can
also select 'Wave Flights' on the main Toolbar. That
will narrow the focus of the On-Line Thermal Browser to
only download wave spots, when the 'Fetch Thermals'
button is pressed.
|
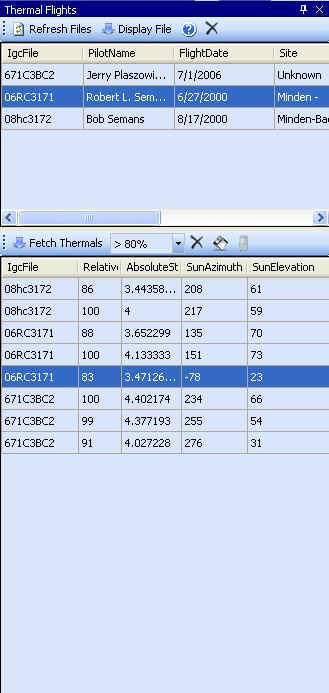
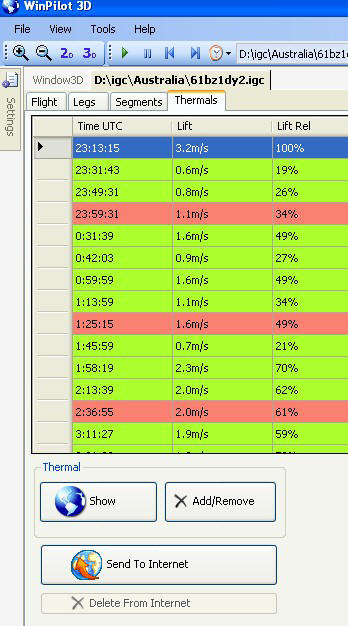 Uploading Thermals and IGC files to our web site
can be done via Statistics.Thermal window. When a new
IGC flight is open on your local computer using
Menu.Files.Open, A new Tab should be shown next to the
3D Window tab, showing the IGC file name (see picture on
the left). This is the Statistics Tab. By clicking it,
and then by clicking Thermals it is possible to see all
thermals in the selected file. These can be then
uploaded to the web site by pressing the 'Send To
Internet' button. It is possible to select which
thermals should be uploaded and which not by first
selecting a thermal, and then pressing the 'Add/Remove'
button. To see the exact location of a given thermal on
the 3D map, press the 'Show' button while the 3D window
is visible. After the the proper thermals are selected,
press the 'Send To Internet' button. The person who
submitted the thermals, has then an option to remove
them from our web site by pressing the 'Delete From
Internet' button.
Uploading Thermals and IGC files to our web site
can be done via Statistics.Thermal window. When a new
IGC flight is open on your local computer using
Menu.Files.Open, A new Tab should be shown next to the
3D Window tab, showing the IGC file name (see picture on
the left). This is the Statistics Tab. By clicking it,
and then by clicking Thermals it is possible to see all
thermals in the selected file. These can be then
uploaded to the web site by pressing the 'Send To
Internet' button. It is possible to select which
thermals should be uploaded and which not by first
selecting a thermal, and then pressing the 'Add/Remove'
button. To see the exact location of a given thermal on
the 3D map, press the 'Show' button while the 3D window
is visible. After the the proper thermals are selected,
press the 'Send To Internet' button. The person who
submitted the thermals, has then an option to remove
them from our web site by pressing the 'Delete From
Internet' button.
|
 Marking and Uploading Wave Spots. In addition to
database of thermals, WinPilot also contains an on-line
database of wave locations. All registered users can
upload their wave flights/locations to that database.
This data can then be transferred to WinPilot ADV/PRO on
a Pocket PC, and used during a blue wave day, or when a
blue segment of terrain needs to be crossed during a
cross-country wave flight. Here are the steps:
Marking and Uploading Wave Spots. In addition to
database of thermals, WinPilot also contains an on-line
database of wave locations. All registered users can
upload their wave flights/locations to that database.
This data can then be transferred to WinPilot ADV/PRO on
a Pocket PC, and used during a blue wave day, or when a
blue segment of terrain needs to be crossed during a
cross-country wave flight. Here are the steps:
1. Open a wave flight log using File.Open.
2. On the Toolbar, switch from 'Thermal Flights' to
'Wave Flights'. This enables wave segment selection
buttons (see left), and sets them into the 'Select Start
of Wave Segment' mode (see left).
3. Touch a portion of a flight log where you want a
given wave segment to begin. This will change the color
of that spot to blue, and change the default button to
'Select End of Wave Segment'.
4. Touch a portion of a flight log where you want a
given wave segment to end. This will change the color of
that spot to brown, and draw this wave segment on the
screen.
5. If the segment is located properly, click the
'Plus' wave button to add that segment to the local
database. If you want to change this segment, press the
'Delete' wave button (red square), and start over, or
press 'Start' or 'End' wave, and edit these locations.
6. After all wave segments for that flight log have
been added to your satisfaction, you can upload them to
our global database using Statistics.Thermals.Send To
Internet.
Note: If you are preparing for a wave flight, you can
also select 'Wave Flights' on the main Toolbar. That
will narrow the focus of the On-Line Thermal Browser to
only download wave spots, when the 'Fetch Thermals'
button is pressed.
|
Multiple Flight Playback

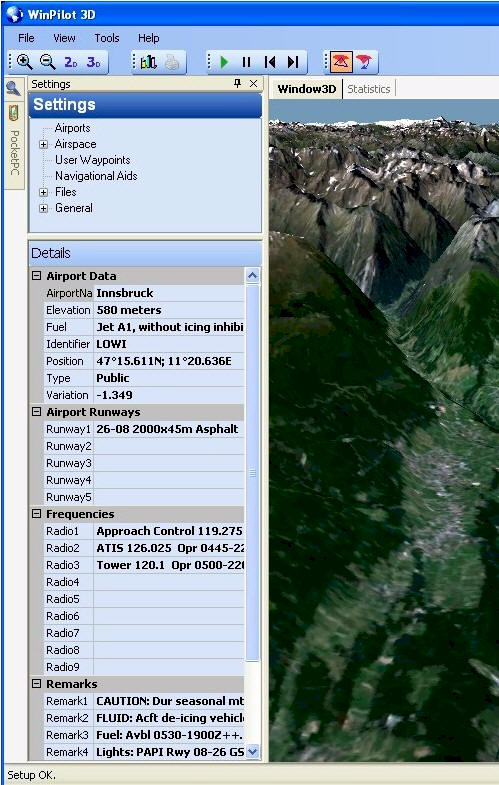
Detailed Airport Information
Includes Airport elevation, runway numbers and layout, Radio
frequencies and remarks.
 Real-time wind calculation during
playback

|
|